Skip to content
  • IT Support & Services
    • Managed IT Support
    • Ad-hoc IT Support & Consultancy
    • Microsoft Access Database Development
    • Managed WiFi Networks
  • Cyber Security
    • About Cyber Security
    • Free Cyber Security Tools
    • Cyber Essentials Certification
    • Backup & Disaster Recovery
    • Bitdefender GravityZone Business Security
    • Cyber Security Awareness Training
    • Password Management
  • Microsoft 365
    • Microsoft 365 Support & Management in Kent
    • Microsoft 365 Business Premium
    • Microsoft 365 Backup
    • Microsoft 365 Email Security
    • Microsoft 365 Management
    • Email Signature Management
    • Email Encryption & E-Signatures
  • Contact / About
    • Contact Us
    • About Us
    • Book a phone or Teams call with us
    • Partnerships
    • Blog
    • Legal Information
  • Client Area
    • Remote Support
    • Microsoft 365 Guides
    • Password Management
    • Cyber Security Training
    • Email & Data Migrations
    • Legal Information

Call us on 01304 728287

Book a free IT chat
Magic IT ServicesMagic IT Services
  • IT Support & Services
    • Managed IT Support
    • Ad-hoc IT Support & Consultancy
    • Microsoft Access Database Development
    • Managed WiFi Networks
  • Cyber Security
    • About Cyber Security
    • Free Cyber Security Tools
    • Cyber Essentials Certification
    • Backup & Disaster Recovery
    • Bitdefender GravityZone Business Security
    • Cyber Security Awareness Training
    • Password Management
  • Microsoft 365
    • Microsoft 365 Support & Management in Kent
    • Microsoft 365 Business Premium
    • Microsoft 365 Backup
    • Microsoft 365 Email Security
    • Microsoft 365 Management
    • Email Signature Management
    • Email Encryption & E-Signatures
  • Contact / About
    • Contact Us
    • About Us
    • Book a phone or Teams call with us
    • Partnerships
    • Blog
    • Legal Information
  • Client Area
    • Remote Support
    • Microsoft 365 Guides
    • Password Management
    • Cyber Security Training
    • Email & Data Migrations
    • Legal Information

Microsoft 365 Setup Guides

This page is information for our clients who are setup with Microsoft 365 (formerly known as Office 365) and associated services.

You should have already received your login credentials securely, but if you are subscribed to our secure password management system, you will be able to retrieve these from there as well.

For an additional level of security for sign-ons, we strongly recommend the use of multi-factor authentication (MFA) detailed below and this will now be enabled as default for all clients.

If you require any other help, please contact us. Please also let us know if you notice that anything here is incorrect or have suggestions of new articles we could add.

Last updated on 06/05/2025 10:30

Current Topics

How to access your email

Download Microsoft Office software

Access and use Shared Mailboxes

Changing Passwords

Multi Factor Authentication

Email signatures

Microsoft 365 Security (Vade Secure)

Microsoft 365 Backup

Email Encryption and E-Signatures (DeliverySlip)

Go to top

How to access your email

Using a web browser
In a web browser, you can access email, calendar and more via Outlook on the Web via either https://outlook.office.com/ or https://office.com/

Using a mobile device (iOS or Android)
For mobile devices using either Android or iOS, we recommend using Microsoft’s Outlook App. You can find these in your Play Store (Android) or App Store (Apple/iOS), or you can get a link sent to your phone here. This app provides more facilities than the standard email clients have built in. You will need your email address and password to set this up.

If you have migrated from another email system, we recommend removing this once you are happy with the new setup.

You can find more information about the app here: https://www.microsoft.com/en-us/microsoft-365/outlook-mobile-for-android-and-ios

For instructions of how to setup your Microsoft 365 email on the Outlook App for iOS, click here

For instructions of how to setup your Microsoft 365 email on the Outlook App for Android, click here

Using Outlook as a PC or Mac program
For PC and Mac users, Microsoft Outlook can be set up to connect to your email account.

If you are using a PC, you can use Outlook provided with a Microsoft 365 licence, Office LTSC 2021 (until October 13th 2026) and Office LTSC 2024 (until October 9th 2029).  Earlier versions of Outlook (2007, 2010, 2013, 2016 and 2019) are not supported. We would always recommend using Outlook /Office software via Office 365 to ensure you are kept up to date and supported. If your licence doesn’t currently include this, please contact us.

Currently either Outlook (classic) or New Outlook are compatible, although New Outlook does have restrictions on integration with other applications and plug-ins.

For Mac users, connecting to Microsoft 365 services using Office 2016 for Mac isn’t supported.

You will need your email address and password to set this up.

If you have migrated from another email system, we recommend removing this.

Go to top

Microsoft Office Software

If you are subscribed to a Microsoft 365 product that includes Microsoft Apps (desktop programs), you can download these from https://office.com/ using the top right hand option to “Install Office”. Please note that for PC users, some existing systems may require use of the 32-bit version of Microsoft Office rather than the default download of 64-bit.

We would always recommend removing any existing versions of Office software from your PC/Mac and rebooting before downloading this version.

Microsoft Teams software will generally only show up after you have rebooted after the installation has completed.

Go to top

Shared Mailboxes

If you have been setup with a shared mailbox, depending on how you access your email, you may need to open this seperately, or it may show up automatically.

A shared mailbox makes it easy for a group of people to monitor and send email from a public email address, like . When a person in the group replies to a message sent to the shared mailbox, the reply appears to come from the shared address, not from the individual person.

How to access Shared Mailboxes:

Using Outlook on the Web
Choose the option that suits the way you want to work best.  The option to open the shared mailbox in another window allows you to receive notifications of new emails.

Add the shared mailbox so that it displays under your primary mailbox

  1. Sign in to your account in Outlook on the web.
  2. Right-click Folders in the left navigation pane, and then choose Add shared folder.
  3. In the Add shared folder dialog box, type the name or email address of someone who has shared a mailbox with you, and then click Add. Or, type the name of the shared mailbox you are a member of, such as .

Open the shared mailbox in a separate browser window

Use this method if you want to view and manage the email for the shared mailbox in its own browser window. This method also lets you receive notifications of new items in the Inbox of the shared mailbox.

  1. Sign in to your account in Outlook on the web.
  2. On the Outlook on the web navigation bar, click your name. A list appears.
  3. Click Open another mailbox.
  4. Type the email address of the other mailbox that you want to open, and then click Open. Another Outlook on the web session opens in a separate window, allowing access to the other mailbox.

You can read more including sending emails from the shared mailbox here: https://support.microsoft.com/en-us/office/open-and-use-a-shared-mailbox-in-outlook-on-the-web-98b5a90d-4e38-415d-a030-f09a4cd28207

Using the Outlook App for iOS or Android
  1. Sign in to your primary account in Outlook for iOS or Android.

  2. Tap the Add Account button in the left navigation pane, then tap Add a Shared Mailbox.

  3. Choose the account that already exists in Outlook to log in with.
  4. Enter in the shared mailbox email address. If you are uncertain of this, please contact us.

More information is here: https://support.office.com/en-gb/article/add-a-shared-mailbox-to-outlook-mobile-f866242c-81b2-472e-8776-6c49c5473c9f

Using Outlook (classic) for a PC
Shared Mailboxes will show up automatically in the left hand Folder Pane on a PC, although there may be a delay initially.
Using New Outlook for a PC
Shared Mailboxes will show up inside the “Shared With Me” folder in the Folder Pane on the left hand side.  You may need to close and reload New Outlook for shared mailboxes we have granted you access to, to show up.
Using Outlook for Mac
Outlook for Mac does not support auto-mapping of shared mailboxes in the same way that Outlook for Windows does.

  1. In the Tools menu, choose Accounts, and select the account that has access to the mailbox.
  2. Select Delegation and Sharing
  3. Choose Shared With Me tab
  4. Choose + to add a shared or delegated mailbox

    Note:  If you have permissions to custom folders in the mailbox but not to the top-level mailbox folder, the custom folders will not appear in the folder list. Only default folders that you have permissions to, such as Inbox, Sent Items, Deleted Items, and Calendar, will appear in the folder list without top-level mailbox folder permissions.

  5. Alternatively, you can also go to File > Open > Shared Mailbox, to open a shared or delegated mailbox.

Reference: https://support.microsoft.com/en-us/office/open-a-shared-folder-or-mailbox-in-outlook-for-mac-6ecc39c5-5577-4a1d-b18c-bbdc92972cb2

Using Legacy Outlook for Mac
Outlook for Mac does not support auto-mapping of shared mailboxes in the same way that Outlook for Windows does.

  1. On the Tools menu, click Accounts.
  2. Click the Plus Sign to add an additional Exchange account.
  3. In the E-mail address field, enter the email address of the shared mailbox.
  4. Select Sign in with another Account if you see that option.
  5. Under Authentication, enter your own email address and password that has permissions to the shared folder.
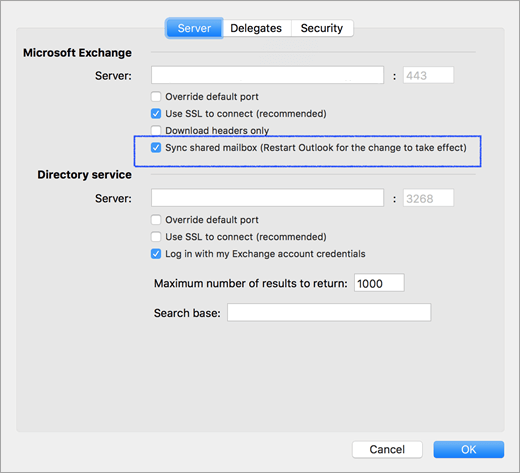
  6. Check the Sync shared mailbox option. This allows Outlook to synchronise the shared mailbox without having to use the Send/Receive option. This setting was added in version 16.13.411. Enabling this setting is highly recommended for users who use their own credentials to access a shared mailbox.

Sync a shared mailbox

Reference: https://support.microsoft.com/en-us/office/open-a-shared-folder-or-mailbox-in-outlook-for-mac-6ecc39c5-5577-4a1d-b18c-bbdc92972cb2

More information and How To’s:

Send mail from the shared mailbox using a PC/Mac with Outlook installed
  1. Open Outlook.
  2. Choose New Email.
  3. If you don’t see the From field at the top of your message, choose Options > From.
  4. Click From in the message, and change to the shared email address. If you don’t see your shared email address, choose Other email address and then click on “From…”and select the shared mailbox from the list. DO NOT enter the email address in instead of this selection method as you will get undeliverable errors otherwise.
  5. Choose OK.
  6. Finish typing your message and then choose Send.

From now on when you want to send a message from your shared mailbox, the address will be available in your From drop down list.

Whenever you send a message from your shared mailbox, your recipients will only see the shared email address in the message.

Reply to mail sent to the shared mailbox using a PC/Mac with Outlook installed
  1. Open Outlook.
  2. Open the email message you want to reply to.
  3. From field at the top of your message, you should see the name of your shared mailbox. If you don’t, choose the From dropdown box and choose your shared mailbox.
  4. Finish typing your message and then choose Send.

When you want to send a message from your shared mailbox, the address will be available in your From drop down list.

Whenever you send a message from your shared mailbox, your recipients will only see the shared email address in the message.

Go to top

Changing Passwords

Once you are setup, you can always change your password at any time.

You can do this by logging on at https://www.office.com/ with your current login and password.

At the top right hand corner, you will see a ‘cog’ icon which gives you access to a menu where you can change the password. Alternatively, we can always change this for you.

Remember that you will have to enter the new password into any devices that connect to your email or Office 365 (not just Outlook, but often OneDrive, Teams etc).

By default the recommendations for Microsoft 365 are now to not force password changes every 90 days. Through research Microsoft consider this can actually make accounts less secure as it leads to users:

  • choosing weaker passwords to begin with, because they don’t want to learn complex new passwords each time they are forced to change it.
  • choosing new passwords that are only a minor variation of their previous password, e.g. Monday01 changes to Monday02.


Microsoft instead recommends:

  • An 8-character minimum password length (Azure AD/Office 365 has a maximum password length of 16 characters for cloud identities)
  • Remove character composition requirements (i.e. don’t require combinations of uppercase, lowercase, numbers, special characters, etc)
  • No password expiration
  • Ban common passwords
  • Educate users to not re-use corporate passwords for other systems and apps
  • Enforce multi-factor authentication
  • Enable risk-based multi-factor authentication challenges


If you want to change passwords for other users, if you don’t already have access we can always grant authorised users access to the Microsoft 365 Admin Center.

Go to top

Multi Factor Authentication

For an additional level of security for sign-ons, we strongly recommend the use of multi-factor authentication (MFA) and we now enable this by default on all clients.

By default, Microsoft 365 supports MFA for user accounts using:

  • A text message (SMS) sent to a phone that requires the user to type a verification code.
  • A phone call.
  • The Microsoft Authenticator smart phone app (recommended).

We can configure MFA to be enabled on your account. Once enabled you can use the following link to configure it: https://aka.ms/MFASetup

New accounts will default to Microsoft’s latest Security Defaults which include MFA being enabled. If you login to your account at office.com, you may be prompted to “Help us to protect your account” which will step you through setting this up.

We would suggest that you download and use the Microsoft Authenticator App if you aren’t already using an alternative one.  Then in the setup you can use “Mobile App”. Our guidance is to steer away from SMS based authentication options because they can be less secure than expected.

Once it is setup, make sure you only allow any requests for access that you have seen come from a program on your computer or your mobile device, otherwise you could let a hacker into your account.

IMPORTANT: Once the Microsoft Authenticator App is setup, make sure you go into the Settings section and enable the backup option.  This will require being linked to a personal email account, but this will allow you to recover your accounts to a new device when you replace your existing one.

Go to top

Email Signatures

If you are a subscriber to our email signature service, your branded email signatures will be available to all your users.

Our email signature service provides standardised branding and ensures your emails contain compulsory legal information across all devices: Outlook on PC/Mac, Outlook on the web and mobile devices.

We normally include a basic disclaimer and legally required information for your registered company details, but please ensure you check this and also let us know if your industry or associations require additional information.

By default, we enable “server-side” signatures so that your email signature will be added to any email you send out (from a mobile device, Outlook on the Web or Outlook on the Desktop).

Please note that as of October/November 2022, Microsoft is introducing roaming signatures as part of a new component to roam settings between installations of Outlook.  This does not provide anywhere near the same level of design and control as our signature solution, but the rollout of this can cause issues.

At present, if you have the Desktop Agent installed, it should disable these new settings for the time being, but it appears the development of this system has not been completed by Microsoft, so this is a temporary facility to disable the settings until this is complete.  The new system can seriously affect email signatures being set as they used to be, so if you encounter any issues, please let us know.

You can read Exclaimer’s blog post about the new service here https://www.exclaimer.com/blog/outlook-roaming-signatures-vs-exclaimer/

Please see below for signature details on each type of device:

Using Outlook on the Web
Email signatures will automatically be available to you as part of our standard installation. You don’t need to install anything else.

When you create an email, you will see an icon for “Exclaimer Cloud”, which allow you to choose from any signatures applied to you.  You can see more information about how to uses this in Outlook on the web, here: https://support.portal.exclaimer.com/hc/en-gb/articles/360020605057

Please note that signatures unfortunately can take up to 6 hours to appear automatically in Outlook on the Web if you have recently been setup on this service. However, if your signatures have been setup to add them in transit (server-side), the system should automatically add it after you send any emails in the meantime.

Using the Outlook App for iOS or Android or standard mobile email
You won’t see the email signature at the bottom of the email you are sending with this option,  but the email signature will automatically be added after you have sent the email and before it arrives at its destination.

Depending on the setup you may or may not see the signature in your “Sent Items” folder.

We recommend that you remove any existing signature in the App e.g. ” Get Outlook for iOS “

Using Outlook as a PC or Mac program

Exclaimer Outlook Add-in

We will install the Exclaimer Outlook Add-in as part of our standard installation. This recent option requires:

Windows

  • Outlook on Windows (Microsoft 365 Subscription) [version 2409 (Build 18025.20000)]
  • Outlook on Windows (Retail Perpetual) [version 2501 (Build 18429.20132)]
  • Outlook 2024 on Windows (Volume-licensed perpetual) [version 2408 (Build 17932.20222)]
  • Microsoft Outlook Web Access
  • Microsoft Windows 10, Windows Server 2016 or above

Mac

  • Outlook on Mac [version 16.89 (24090815) or above] NOTE: Only the New Outlook interface is supported. Go to Outlook > New Outlook to enable it.

Mobile

  • Android: Outlook version 4.2433.0 or above
  • iOS: Outlook version 4.2433.0 or above

You can see more information about how to use this in Outlook, here: https://support.portal.exclaimer.com/hc/en-gb/articles/360020605057

Desktop Agent (Windows)

For versions of Outlook not supported by the Exclaimer Cloud Outlook Add-in above, or if you use multiple email accounts or configure different signatures for new and reply emails, you can use the Desktop Agent.  This will also insert the email signature as you create the email rather than selecting it from the add-in.  Therefore, this add-in is still also recommended to be installed at this time.

This agent requires Windows 10 or above and Outlook 2016 or above. It will need to be installed on each PC where Outlook is installed.

You can download the program from this link which also includes corporate installation options: https://outlookclient.exclaimer.net/csua/index.html

Desktop Agent (macOS)

The Exclaimer Cloud Signature Update Agent for Mac was discontinued because of their move towards Apple silicon.  Therefore, the Exclaimer Outlook Add-in is now the recommended solution which we provision within Microsoft 365 for you.

Go to top

Microsoft 365 Security (Vade Secure)

Our ‘Secure’ packages for Microsoft 365 include Vade Secure.

The solution adds extra filtering security to Microsoft 365. This solution is seamlessly integrated, and as such, all the blocked and allowed list entries that you create on Microsoft 365 will be applied by the filtering solution.

By default only emails containing spam, phishing and potentially harmful messages are moved to the Junk folder.  Emails containing malware, scams or high rated spam are by default, deleted.

Emails detected as being Anti-Spear Phishing* are by default not acted on, but we generally enable a banner warning for these.

*Spear Phishing: A form of social engineering, spear phishing is a malicious email that impersonates an individual for the purpose of tricking a recipient into completing a desired action—typically financial in nature. Often, a hacker will impersonate a victim’s acquaintances, such as colleagues, executives, clients, or vendors. Read more here

Vade Secure integrates into the same processes within Outlook that allow you to mark emails as junk, not junk, block or whitelist senders.

We also configure Threat email reports to be sent to the client’s main contact every week. If you would like access to the Vade Secure portal for your company, please contact us.

If you want to read more, look at the User Guide’s below or contact us.

Vade Quick User Guide

Vade User Guide

Go to top

Microsoft 365 Backup

Some of our packages include our Microsoft 365 backup solution which can provide an encrypted and secure backup of mailboxes, OneDrive and SharePoint.

Mailboxes are backed up to 6 times a day, OneDrive and SharePoint up to 4 times a day.

If you don’t already have this in your package, please contact us to add it. We can also backup workstations and servers, protecting not just the data but providing a way to restore from scratch if for example a hard drive fails.

More details will be provided here soon.

Go to top

Email Encryption and E-Signatures

Once you have login details from us, you can login here:

https://webapp.secure-messaging.com/

More details here soon.

Go to top

Client Area Sections

  • Remote Support
  • Microsoft 365 Setup Guides
  • Password Management Guides
  • Cyber Security Awareness Training
  • Email & Data Migrations
IT Support in Kent
Managed IT Support, Managed Services, Microsoft 365, Cyber Security & Microsoft Access Development in Kent
  • Magic IT Services Ltd, 14 Hazling Dane, Shepherdswell, Dover, Kent CT15 7LS
  • 01304 728287 or 01843 586647
  • hello@magicitservices.co.uk

Magic IT Services Ltd is a company registered in England and Wales, No: 07014535.

Registered Office: 14 Hazling Dane, Shepherdswell, Dover, Kent CT15 7LS. VAT Reg No: GB 979 7435 46

© 2026 Magic IT Services Ltd.

  • Home
  • About Us
  • Privacy Policy
  • Terms of Use
  • Cookie Policy
  • Sitemap
  • Legal Information

Press Enter to search · Esc to close

imunify-bot-check